Create Fuzz Variations in KeyShot
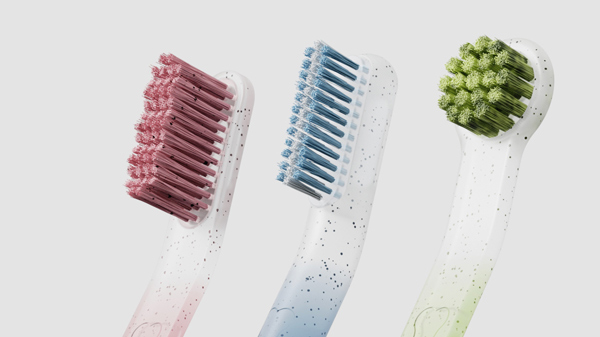
The KeyShot Material Graph has a powerful displacement geometry engine to create advanced material appearances. In previous tuturials, we shared how to use the Material Graph to add surface dust. In a similar fashion, you can apply fuzz to a surface and control it with different parameters. Let’s dive in.
1. Model Preparation
Prepare your model by creating a duplicate Surface of the area where you want the bristles to be located. Ensure to unlink the materials for all parts before proceeding.
{% video_player “embed_player” overrideable=False, type=’scriptV4′, hide_playlist=True, viral_sharing=False, embed_button=False, autoplay=False, hidden_controls=False, loop=False, muted=False, full_width=False, width=’2160′, height=’2700′, player_id=’64907258266′, style=” %}
2. Brush Fuzz Setup
Open the Material Graph for the Surface and add in the following nodes: Fuzz Geometry, Mesh Texture and the Color Invert Utility. Connect the Mesh to the Source on the Colour Invert and it to the Density Texture. Click on the Mesh and Press C on your keyboard, to display the mapping of the texture.
Change the Mapping Type to Planar and Center on Part. Change the Shape to Circle. The black spots will be used as the roots for the bristles and the white areas will remain blank. Use the Wheel to control both the Spacing and Sizing of the pattern. It is possible to adjust these individually as well if necessary.
{% video_player “embed_player” overrideable=False, type=’scriptV4′, hide_playlist=True, viral_sharing=False, embed_button=False, autoplay=False, hidden_controls=False, loop=False, muted=False, full_width=False, width=’3840′, height=’2160′, player_id=’64906845956′, style=” %}
3. Fuzz Material Settings
Add a Plastic Material node and connect it to the Fuzz Surface. Now connect the Fuzz to the Material Geometry. Click Execute Geometry or the Refresh Geometry Nodes to update and display the Brush Fuzz / Bristles. Here are Brush Fuzz settings to get you started, but feel free to experiment with these to achieve your desired look.
- Length: 15mm
- Length Variation, Randomness and Radius: 0.05
- Density: 10 1/mm
- Segments: 50
- Shape: Cylinder
Click Execute Geometry once again to update and show the new properties of the Fuzz. To adjust the color of the bristles, alter the Plastic Material node. To adjust the Mesh Pattern, unplug the Fuzz from Geometry and select Execute Geometry to unapply the Fuzz. Map your Mesh texture as desired, reapply the Fuzz to Geometry and select Execute Geometry to once again reveal the Fuzz.
{% video_player “embed_player” overrideable=False, type=’scriptV4′, hide_playlist=True, viral_sharing=False, embed_button=False, autoplay=False, hidden_controls=False, loop=False, muted=False, full_width=False, width=’3840′, height=’2160′, player_id=’64907250349′, style=” %}
4. Custom Mesh Pattern
To have better control over the design of the brush, create your Mesh Pattern over on Adobe Illustrator and import it in. It is possible to duplicate the Surface and import multiple patterns to get really creative with how the brush will look. (Download example here.)
{% video_player “embed_player” overrideable=False, type=’scriptV4′, hide_playlist=True, viral_sharing=False, embed_button=False, autoplay=False, hidden_controls=False, loop=False, muted=False, full_width=False, width=’3840′, height=’2160′, player_id=’64907251067′, style=” %}
5. Surface Layer Material
Change the Bristles Surface Material from Diffuse to Emissive. Deselect all options in Advance to hide the surface and then position it to sit inside your model for a realistic look.
{% video_player “embed_player” overrideable=False, type=’scriptV4′, hide_playlist=True, viral_sharing=False, embed_button=False, autoplay=False, hidden_controls=False, loop=False, muted=False, full_width=False, width=’3840′, height=’2160′, player_id=’64907251494′, style=” %}
6. Experiment with Color
Now you can get creative and experiment with the color of your Brush Fuzz. Bring in different Texture nodes and plug them in to the Diffuse of the Plastic, explore different Gradient types and colors until you’re satisfied.
{% video_player “embed_player” overrideable=False, type=’scriptV4′, hide_playlist=True, viral_sharing=False, embed_button=False, autoplay=False, hidden_controls=False, loop=False, muted=False, full_width=False, width=’3840′, height=’2160′, player_id=’64906848265′, style=” %}
7. Use a Cutaway block to add varying depths to the bristles
Prepare a model with a pattern/shape of choice. This can be used as a Cutaway material to add some variation in the length of the bristles. Drag the model so the bristles are sitting inside it to begin the Cutaway effect. Change the Cap Style to Inherit Caps to preserve the ends of the bristles. It is also possible to add variations within the Fuzz by adding texture nodes to Length/Direction Texture.
{% video_player “embed_player” overrideable=False, type=’scriptV4′, hide_playlist=True, viral_sharing=False, embed_button=False, autoplay=False, hidden_controls=False, loop=False, muted=False, full_width=False, width=’3840′, height=’2160′, player_id=’64907253563′, style=” %}
8. Get creative and create your own brushes!
There are so many possibilities with fuzz in KeyShot. Explore the different settings with various shapes and patterns to create really unique and interesting variations of your products!
{% video_player “embed_player” overrideable=False, type=’scriptV4′, hide_playlist=True, viral_sharing=False, embed_button=False, autoplay=False, hidden_controls=False, loop=False, muted=False, full_width=False, width=’1080′, height=’1350′, player_id=’64908722542′, style=” %}
You can learn more about the Material Graph and Fuzz in the KeyShot Manual. If you’re interested in trying KeyShot Pro, just visit portal.keyshot.com/try/keyshot.
What Can You Create?
We would love to see what you create with this tip. Visit the KeyShot Amazing Shots forum to see what others are creating and share your own work. And if you have a suggestion for another tip share it in the comments below.


